Saturday 13 November 2010

Vyatta to Cisco - Tunneling from ASA to Vyatta Using VMware and GNS

Its been a while since my last article/lab apologies for that, hopefully I will get back to my once a week schedule (fingers crossed)

So that lab today is for connecting a Vyatta router to a Cisco ASA/PIX and creating a Lan to Lan Tunnel with some one to one src/dst NAT thrown in for good measure :)

Here is the lab:


Here is the proof that is works:

Vyatta to Cisco - Tunneling from ASA to Vyatta Using VMware and GNS from Roggy on Vimeo.


Vyatta config:

interfaces {
ethernet eth0 {
address 10.0.19.1/24
address 10.0.19.10/24
duplex auto
hw-id 00:0c:29:5d:91:c6
smp_affinity auto
speed auto
}
ethernet eth1 {
address 192.168.10.1/24
duplex auto
hw-id 00:0c:29:5d:91:d0
smp_affinity auto
speed auto
}
ethernet eth2 {
duplex auto
hw-id 00:0c:29:5d:91:da
smp_affinity auto
speed auto
}
loopback lo {
}
}
protocols {
static {
route 0.0.0.0/0 {
next-hop 10.0.19.9 {
}
}
}
}
service {
nat {
rule 5 {
destination {
address 10.20.0.0/24
}
exclude
outbound-interface eth0
source {
address 192.168.10.0/24
}
type masquerade
}
rule 100 {
outbound-interface eth0
outside-address {
address 10.0.19.10
}
source {
address 192.168.10.10
}
type source
}
rule 110 {
destination {
address 10.0.19.10
}
inbound-interface eth0
inside-address {
address 192.168.10.10
}
protocol tcp
type destination
}
rule 900 {
outbound-interface eth0
source {
address 192.168.10.0/24
}
type masquerade
}
}
ssh {
allow-root
port 22
protocol-version v2
}
}
system {
host-name R1
login {
user vyatta {
authentication {
encrypted-password $1$Oxg1L7oM$v4Vi.4pW3Ai/fPFIzpDzC0
}
level admin
}
}
ntp-server 0.vyatta.pool.ntp.org
package {
auto-sync 1
repository community {
components main
distribution stable
password ""
url http://packages.vyatta.com/vyatta
username ""
}
}
syslog {
global {
facility all {
level notice
}
facility protocols {
level debug
}
}
}
time-zone GMT
}
vpn {
ipsec {
esp-group ESP-1W {
compression disable
lifetime 3600
mode tunnel
pfs disable
proposal 1 {
encryption 3des
hash sha1
}
}
ike-group IKE-1W {
lifetime 86400
proposal 1 {
dh-group 2
encryption 3des
hash sha1
}
}
ipsec-interfaces {
interface eth0
}
nat-traversal enable
site-to-site {
peer 10.0.29.2 {
authentication {
mode pre-shared-secret
pre-shared-secret letmein
}
ike-group IKE-1W
local-ip 10.0.19.1
tunnel 1 {
allow-nat-networks disable
allow-public-networks disable
esp-group ESP-1W
local-subnet 192.168.10.0/24
remote-subnet 10.20.0.0/24
}
}
}
}
}


/* Warning: Do not remove the following line. */
/* === vyatta-config-version: "webgui@1:dhcp-server@4:conntrack-sync@1:firewall@3:qos@1:webproxy@1:vrrp@1:nat@3:ipsec@2:wanloadbalance@2:cluster@1:system@3:quagga@2:dhcp-relay@1" === */


Pix Config:

!
PIX Version 8.0(2)
!
hostname FW1
enable password 8Ry2YjIyt7RRXU24 encrypted
names
!
interface Ethernet0
nameif outside
security-level 0
ip address 10.0.29.2 255.255.255.0
!
interface Ethernet1
nameif inside
security-level 100
ip address 10.20.0.1 255.255.255.0
!
interface Ethernet2
shutdown
no nameif
no security-level
no ip address
!
interface Ethernet3
shutdown
no nameif
no security-level
no ip address
!
interface Ethernet4
shutdown
no nameif
no security-level
no ip address
!
passwd 2KFQnbNIdI.2KYOU encrypted
ftp mode passive
access-list icmp extended permit icmp any any
access-list NO-NAT extended permit ip 10.20.0.0 255.255.255.0 192.168.10.0 255.255.255.0
access-list IPSEC-TUN extended permit ip 10.20.0.0 255.255.255.0 192.168.10.0 255.255.255.0
pager lines 24
mtu outside 1500
mtu inside 1500
no failover
icmp unreachable rate-limit 1 burst-size 1
no asdm history enable
arp timeout 14400
global (outside) 1 interface
nat (inside) 0 access-list NO-NAT
nat (inside) 1 0.0.0.0 0.0.0.0
access-group icmp in interface outside
access-group icmp out interface outside
access-group icmp in interface inside
access-group icmp out interface inside
route outside 0.0.0.0 0.0.0.0 10.0.29.9 1
timeout xlate 3:00:00
timeout conn 1:00:00 half-closed 0:10:00 udp 0:02:00 icmp 0:00:02
timeout sunrpc 0:10:00 h323 0:05:00 h225 1:00:00 mgcp 0:05:00 mgcp-pat 0:05:00
timeout sip 0:30:00 sip_media 0:02:00 sip-invite 0:03:00 sip-disconnect 0:02:00
timeout uauth 0:05:00 absolute
dynamic-access-policy-record DfltAccessPolicy
no snmp-server location
no snmp-server contact
snmp-server enable traps snmp authentication linkup linkdown coldstart
crypto ipsec transform-set FW1-TRANSFORM esp-3des esp-sha-hmac
crypto map FW1 10 match address IPSEC-TUN
crypto map FW1 10 set peer 10.0.19.1
crypto map FW1 10 set transform-set FW1-TRANSFORM
crypto map FW1 interface outside
crypto isakmp identity address
crypto isakmp enable outside
crypto isakmp policy 100
authentication pre-share
encryption 3des
hash sha
group 2
lifetime 86400
no crypto isakmp nat-traversal
telnet timeout 5
ssh timeout 5
console timeout 0
threat-detection basic-threat
threat-detection statistics access-list
!
!
tunnel-group 10.0.19.1 type ipsec-l2l
tunnel-group 10.0.19.1 ipsec-attributes
pre-shared-key letmein
prompt hostname context


Enjoy!

Monday 23 August 2010

Vyatta - Remote Access VPN with L2TP and PPTP

Hi,

I have done a remote access VPN lab before - with OpenVPN. This one is with the more widely accepted L2TP and PPTP. So accepted infact that both the iphone and ipad like it too.

So here we go how to configure a VM to allow remote access from iPhone,iPad and Windows Xp.

Part1:
Introduction
Setup

Vyatta - Remote Access VPN - L2TP,PPTP -Part1 from Roggy on Vimeo.


Part2:
Setup Continued

Vyatta - Remote Access VPN - L2TP,PPTP -Part2 from Roggy on Vimeo.


Part3:
Actually Configuring L2TP and PPTP

Vyatta - Remote Access VPN - L2TP,PPTP -Part3 from Roggy on Vimeo.


Part4:
Settting up Firewall

Vyatta - Remote Access VPN - L2TP,PPTP -Part4 from Roggy on Vimeo.

Thursday 29 July 2010

Vyatta - Final 6.0 with updated VMtools for vSphere 4.1

So its been a busy few weeks with all the news and related blog articles on vSphere 4.1
I finally got around to extracting vmtools 8.3.x and intergrating it into the Vyatta Appliance.

There is also something different with this release, the source code for vmtools has been modified to prevent Large Recieve Offload.LRO is defined as:

In computer networking, large receive offload is a technique for increasing inbound throughput of high-bandwidth network connections by reducing CPU overhead. It works by aggregating multiple incoming packets from a single stream into a larger buffer before they are passed higher up the networking stack, thus reducing the number of packets that have to be processed. In Linux, it is generally used in conjunction with the New API (NAPI) to also reduce the number of interrupts.

There have been a few users reporting an issue with LRO and others requesting the intergration of the latest version of VMtools..so here you go:

Download Vyatta VC 6 with LRO patch and the latest VMtools


I would like a few people to test this release and let mw know how it goes before making it live on the VAM.


References:
http://www.vyatta.org/forum/viewtopic.php?t=3030&postdays=0&postorder=asc&start=105
http://nwsmith.blogspot.com/2010/07/patching-vmxnet-to-disable-lro.html
http://en.wikipedia.org/wiki/Large_receive_offload

Tuesday 20 July 2010

vSphere 4.1 and KB1011292

Hi everyone,

So I have been trying to get together some hands on 4.1 videos for you guys (and girls)
however KB1011292 has been my main reason for not upgrading.

What is KB1011292 I here you ask?:
"VMware View Composer 2.0.x is not supported in a vSphere vCenter Server 4.1 managed environment as vSphere vCenter Server 4.1 requires a 64 bit operating system and VMware View Composer does not support 64 bit operating systems.

VMware View 4.0.x customers who use View Composer should not upgrade to vSphere vCenter Server 4.1 at this time. Our upcoming VMware View 4.5 will be supported on VMware vSphere 4.1.
"


As you know the supported way of upgrading your vSphere enviroment is like this:
1) Upgrade vCenter
2) Upgrade ESX hosts
3) Upgrade vmware tools
4) Upggrade vm hardware version.

Therefore if you run VMware View 4 with composer your trip into 4.1 greatness is going to come grinding to a halt with step 1.

Having VDI is great however it makes upgrading a pain...so roll on VMware View 4.5 with your 64bit composer.


And for those not tide to VDI here is the Vsphere upgrade guide:
Upgrade Guide

Tuesday 13 July 2010

vSphere 4.1!

OK, so vSphere 4.1 is out! and now the embargo is lifted I can finally share some of the awesome new features in 4.1.

Now lets be honest there are so many new and cool features in 4.1 that most other companies would probably release it as a version 5.0!But VMware release it as a point release...and that's cool.

Enough of the chit chat you did not come here to hear how great VMware is, its more about what are these new features? Is it worth upgrading to? and are they worth all the fuss?

So the features:


and here is a summary of the features that I think really count and why:

1)Storage I/O control
Prioritized use of storage (similar to how compute is prioritized with vSphere)
this means you can now make sure that your "VIV"s or Very Important VMs get the IO they need when you have IO congestion. This is done via the I/O Shares within the VM properties.

2)Network I/O Control
Set different levels of service per Storage Flow type.
virtual machine, vMotion, FT, and IP storage traffic.
This means you can make iSCSI or NFS take priority over vMotion.
But there is a gotcha:
Enabled with Distributed Switch only and therefore Enterprise Plus only


3)Memory Compression
Slower than real memory but much faster than swapping to disk.
Improves the performance for the VM when under contention as far less memory is swapped to disk.


4)vMotion Performance Increases and Scale Increases
Allows up to 4 on a 1Gbps network and 8 on a 10Gbps network.

5) Storage vMotion Scale Increases
Allows up to 128 (both VMFS and NFS)

6) DRS Host affinity
Allows you set set rules on where your VMs vMotion to when DRS needs to move them.
e.g. VM W2003-DC1 only goes to DRS Group 1, however VM W2003-Exchange only goes to DRS Group 2.

Here is where you create the rules:


7)vStorage API for Array Integration
This is another great feature (if supported by your SAN),
essentially this means vSphere can interact directly with your SAN.
Therefore instead of copying the files from one datastore to another, it instructs the SAN to move the blocks for you! Increasing the performance for Storage vMotion and Provisioning VMs etc


Also noteworthy:
4.1 will be the last release for ESX (ESX Classic) from now on there will only be ESXi releases


The binaries are avalible now so go grab them!

References:
Thanks for John Toyer@vmware

Friday 9 July 2010

Download my videos!

Hi Everyone,

I noticed last night (and was messaged by a few people) that some of my latest videos seem to have been encoded in a lower resolution, therefore I have reencoded, reupped and reembedded these videos.

However I wanted to take this opportunity to let you know that one of the reasons I chose Vimeo is that you can download my videos for free!
Registration is much quicker than most, you can download all my videos and then play them back any time.

Once you register you will see a "Download Video" option on the right hand side.

Here are some links to get you started:
Vyatta Internet Gateway
Vyatta Remote Access OpenVPN lab with NAT and Firewall setup
Vsphere within VMware Workstation 7 Part 1
Samba Cluster with GFS 2, Centos 5, iSCSI and Openfiler - Part 1
Router on a Stick within vSphere using Vyatta and Optimizing for 1Gbps Routing - Part 1


Enjoy (offline!)

Sunday 4 July 2010

Setting up Windows 2008 Network LoadBalancing with vSphere

So I came across a few posts recently during my travels where a couple of
people were having issues with setting up Windows Network Load Balancing within
vSphere and in particular with Distributed vSwitches.

So here we go - how to setup NLB with IIS:


And here is the video:
1)Setting up NLB
2)Going through setup of vSphere Enviroment
3)Installing IIS
4)Testing for Failure
5)Going Through the vDS settings


Setting up Windows Network Load Balancing within vSphere from Roggy on Vimeo.


Enjoy!

Sunday 20 June 2010

Roggyblog on Twitter!

If you have a question/suggestions tweet me:
@roggyblog

New Vyatta Appliance!

This is the most up to version of the VC6.0 release (June 01, 2010)
with VMware tools installed and ready to go.

Here is the download from VMware:
http://www.vmware.com/appliances/directory/383813

and the direct link:
here

VMware View 4 - Tour!

Hey Everyone,


This is a long overdue video however it should be worth it :)

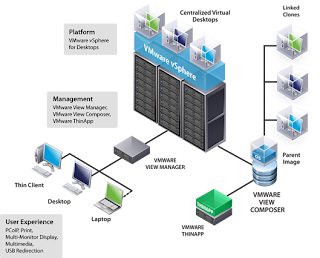
Hopefully this video will help those of you trying to get to griping with VDI/VMware View and answers questions like:

1) What is the composer? What does it do?
2) What is the agent? How do I fix "waiting for agent"?
3) What is PCoIP?
etc..

Reference Diagram:


Part 1:
Tour of VMware View 4
Components Required
Where to install components
What each bit does

VMware View 4 - Part 1 from Roggy on Vimeo.


Part 2:
Using the VMware View Manager
Desktop pools
Entitlement
Playing 720p video within VMware View Client with PCoIP


VMware View 4 - Part 2 from Roggy on Vimeo.


Enjoy!


Sources:
Picture taken from here (ty!):
http://www.ntpro.nl/blog/uploads/

Sunday 13 June 2010

Multipathing and Multiple Connections Per Session - Two sides of the same iSCSI coin?

One again a record breaking title for a post! lets hope my google-fu is not
effected by long titles...or I'm in real trouble ;)

So I was working today on something that envolved me testing iSCSI functionality with Windows Server 2008.
While I was waiting for the VM to come up, I set about testing the iSCSI initiator within Windows 7.

What interested me most was a feature called "MCS" which stands for Multiple Connections Per Session and is defined within RFC-3720 and as such a a protocol level feature that allows features we have previously seen with MPIO.

Here is how to get there:

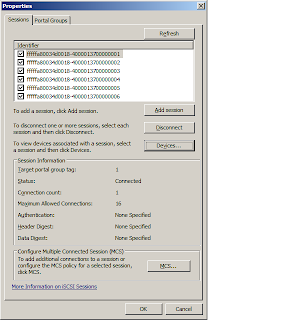
Load the iscsi software from Control Panel->Administative Tools->iSCSI Initiator:
Pic1:


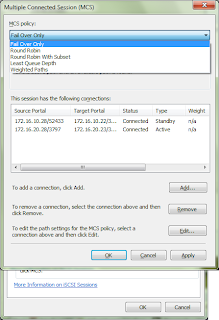
Select the Target from the list click "properties"
Pic2:


Select the MCS policy you wish to have, I selected "fail over only" which is the same
as "fixed" in MPIO world.


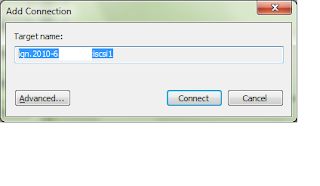
Pic3:


You probably will only have one session at the moment, therfore click "add"
Dont click "connect"!

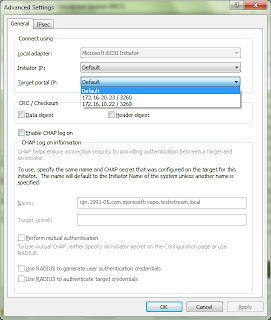
Pic4:


Click "Advanced"
Here is where you pick the other iSCSI target portal.

Pic5:


And thats great! we have a redundant path to our iSCSI targets..but notice this button:

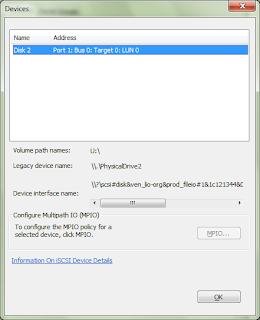
Pic6:


Hmm MPIO is not avalible within Windows 7, which is fine as MCS pretty much gets us to the same place (Inface some say MCS is better) however with Windows Server 2008 we have the option of MPIO so lets give it a go!

First thing to remember is that MPIO is a driver thing so if you have an EMC,3par,netapp,Dell etc device they all have MPIO driver for Windows 2008 so you need to follow their instructions (and look for DSM instructions), here we are using Windows 2008 Software iSCSI Initiator and Windows Server 2008 native MPIO driver.

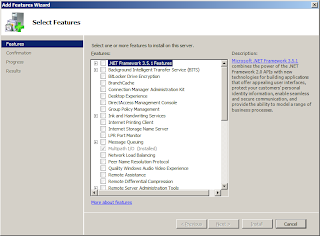
When you install/start iscsi on windows server 2008 it asks you to install MPIO, if you said no..or just forgot install MPIO like this:

From the "Add features Wizard"
Pic1:


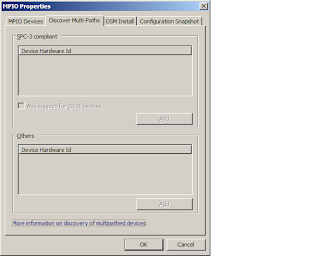
Once installed select MPIO from Control Panel click "Add support for iSCSI devices"
then reboot (p.s. here is where you would add the 3rd Party DSM drive btw)

Pic2:


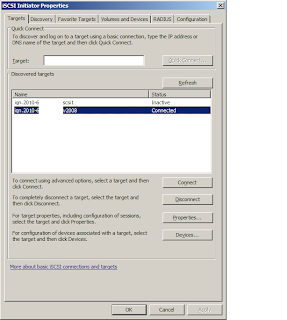
Go Back to the iscsi Initiator (within Administrative tools)
Pic3:


Select the target click properties
Pic4:


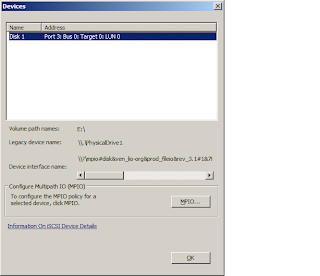
Highlight the sessions click "Devices..."

Pic5:


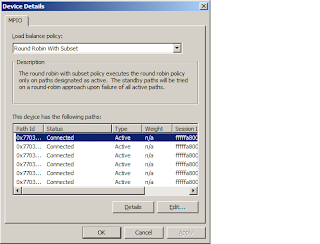
Click MPIO and select the Policy you want
Pic6:


Hope that helps someone out there!


Sources:
http://www.ietf.org/rfc/rfc3720.txt

http://www.windowsitpro.com/article/virtualization2/Q-With-iSCSI-what-s-the-difference-between-Multipath-I-O-MPIO-and-multiple-connections-per-session-MCS-.aspx

Sunday 6 June 2010

Thank You VMware - vExpert for Roggy!


A certain sense of disbelief hit me when I received the email from John Troyer letting me know that I had become a vExpert 2010.
It is an honour to be given this award especially considering the company I am in and the sites they have created:
Duncan Epping Yellow Bricks
Edwin Friesen Thinstall Guru
Eric Sloof NTPRO.NL
These sites are not only unique but also technically outstanding and if you have not bookmarked them already I suggest you do!
So thank you VMware and thank you John Troyer for making giving back to the community so easy

Friday 4 June 2010

Basic BGP - Path Selection with Vyatta

There is actually very little BGP documentation out there on Vyatta, which is strange as if there is one real strength of Vyatta it is BGP.
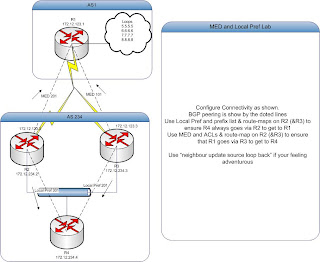
This set of videos is all about BGP and if it proves popular I will do some more with some more advanced features.

Here is the Picture:


Basic BGP - Path Selection with Vyatta -Part 1
General Setup

Basic BGP - Path Selection with Vyatta -Part 1 from Roggy on Vimeo.


Basic BGP - Path Selection with Vyatta -Part 2

Checking BGP peering
Adding Next-hop-self


Basic BGP - Path Selection with Vyatta -Part 2 from Roggy on Vimeo.


Basic BGP - Path Selection with Vyatta -Part 3
Creating ACLs
Creating Prefix Lists
Creating Route-maps
Setting Local Pref
Setting Med
Clearing a Peer


Basic BGP - Path Selection with Vyatta -Part 3 from Roggy on Vimeo.


Although it can seem a little boring, I always like to include the full configs:
R1

firewall {
all-ping enable
broadcast-ping disable
conntrack-table-size 32768
conntrack-tcp-loose enable
ip-src-route disable
ipv6-receive-redirects disable
ipv6-src-route disable
log-martians enable
name ALLOW_ESTABLISHED {
default-action drop
rule 10 {
action accept
state {
established enable
}
}
}
receive-redirects disable
send-redirects enable
source-validation disable
syn-cookies enable
}
interfaces {
ethernet eth0 {
address 172.12.123.1/24
description R1-R2-R3
duplex auto
hw-id 00:0c:29:fe:17:2d
smp_affinity auto
speed auto
}
ethernet eth1 {
duplex auto
hw-id 00:0c:29:fe:17:37
smp_affinity auto
speed auto
}
ethernet eth2 {
address dhcp
duplex auto
hw-id 00:0c:29:fe:17:41
smp_affinity auto
speed auto
}
loopback lo {
address 5.5.5.5/24
address 6.6.6.6/24
address 7.7.7.7/24
address 8.8.8.8/24
}
}
policy {
}
protocols {
bgp 1 {
neighbor 172.12.123.2 {
remote-as 234
}
neighbor 172.12.123.3 {
remote-as 234
}
redistribute {
connected {
}
}
}
}
service {
dns {
forwarding {
cache-size 150
listen-on eth1
name-server 208.67.222.222
name-server 208.67.220.220
}
}
nat {
rule 10 {
outbound-interface eth0
source {
address 192.168.10.0/24
}
type masquerade
}
}
ssh {
allow-root
port 22
protocol-version v2
}
}
system {
host-name R1
login {
user root {
authentication {
encrypted-password $1$ORKO400D$9GoL/vifapZLo3p.sLkUs/
plaintext-password ""
}
level admin
}
user vyatta {
authentication {
encrypted-password $1$Z9oMjC/m$r.T2vNILnVuZnIwkKhg58.
}
level admin
}
}
ntp-server 0.vyatta.pool.ntp.org
package {
auto-sync 1
repository community {
components main
distribution stable
password ""
url http://packages.vyatta.com/vyatta
username ""
}
repository lenny {
components main
distribution lenny
password ""
url http://packages.vyatta.com/debian/
username ""
}
repository VC6 {
components main
distribution VC6.0
password ""
url http://packages.vyatta.com/vyatta/
username ""
}
}
syslog {
global {
facility all {
level notice
}
facility protocols {
level debug
}
}
}
time-zone GMT
}


/* Warning: Do not remove the following line. */
/* === vyatta-config-version: "cluster@1:dhcp-relay@1:dhcp-server@4:firewall@3:ipsec@2:nat@3:quagga@1:system@3:vrrp@1:wanloadbalance@2:webgui@1:webproxy@1" === */
/* Release version: VC6.0-2010.03.22 */


R2

firewall {
all-ping enable
broadcast-ping disable
conntrack-table-size 32768
conntrack-tcp-loose enable
ip-src-route disable
ipv6-receive-redirects disable
ipv6-src-route disable
log-martians enable
name ALLOW_ESTABLISHED {
default-action drop
rule 10 {
action accept
state {
established enable
}
}
}
receive-redirects disable
send-redirects enable
source-validation disable
syn-cookies enable
}
interfaces {
ethernet eth0 {
address 172.12.123.2/24
description R1-R2-R3
duplex auto
hw-id 00:0c:29:fa:84:8d
smp_affinity auto
speed auto
}
ethernet eth1 {
address 172.12.234.2/24
description Inside
duplex auto
hw-id 00:0c:29:fa:84:97
smp_affinity auto
speed auto
}
ethernet eth2 {
address dhcp
description DMZ
duplex auto
hw-id 00:0c:29:fa:84:a1
smp_affinity auto
speed auto
}
loopback lo {
}
}
policy {
access-list 100 {
rule 10 {
action permit
destination {
any
}
source {
any
}
}
}
access-list 150 {
rule 10 {
action permit
destination {
any
}
source {
inverse-mask 0.0.0.255
network 172.12.234.0
}
}
}
route-map SET-LOCAL-PREF {
rule 10 {
action permit
match {
ip {
address {
access-list 100
}
}
}
set {
local-preference 301
}
}
}
route-map SET-MED {
rule 10 {
action permit
match {
ip {
address {
access-list 150
}
}
}
set {
metric 201
}
}
rule 20 {
action permit
match {
ip {
address {
access-list 100
}
}
}
}
}
}
protocols {
bgp 234 {
neighbor 172.12.123.1 {
remote-as 1
route-map {
export SET-MED
}
}
neighbor 172.12.234.4 {
nexthop-self
remote-as 234
route-map {
export SET-LOCAL-PREF
}
}
redistribute {
connected {
}
}
}
}
service {
dns {
forwarding {
cache-size 150
listen-on eth1
name-server 208.67.222.222
name-server 208.67.220.220
}
}
ssh {
allow-root
port 22
protocol-version v2
}
}
system {
host-name R2
login {
user root {
authentication {
encrypted-password $1$ORKO400D$9GoL/vifapZLo3p.sLkUs/
plaintext-password ""
}
level admin
}
user vyatta {
authentication {
encrypted-password $1$Z9oMjC/m$r.T2vNILnVuZnIwkKhg58.
}
level admin
}
}
ntp-server 0.vyatta.pool.ntp.org
package {
auto-sync 1
repository community {
components main
distribution stable
password ""
url http://packages.vyatta.com/vyatta
username ""
}
repository lenny {
components main
distribution lenny
password ""
url http://packages.vyatta.com/debian/
username ""
}
repository VC6 {
components main
distribution VC6.0
password ""
url http://packages.vyatta.com/vyatta/
username ""
}
}
syslog {
global {
facility all {
level notice
}
facility protocols {
level debug
}
}
}
time-zone GMT
}


/* Warning: Do not remove the following line. */
/* === vyatta-config-version: "cluster@1:dhcp-relay@1:dhcp-server@4:firewall@3:ipsec@2:nat@3:quagga@1:system@3:vrrp@1:wanloadbalance@2:webgui@1:webproxy@1" === */
/* Release version: VC6.0-2010.03.22 */


R3

firewall {
all-ping enable
broadcast-ping disable
conntrack-table-size 32768
conntrack-tcp-loose enable
ip-src-route disable
ipv6-receive-redirects disable
ipv6-src-route disable
log-martians enable
name ALLOW_ESTABLISHED {
default-action drop
rule 10 {
action accept
state {
established enable
}
}
}
receive-redirects disable
send-redirects enable
source-validation disable
syn-cookies enable
}
interfaces {
ethernet eth0 {
address 172.12.123.3/24
description R1-R2-R3
duplex auto
hw-id 00:0c:29:21:bd:6f
smp_affinity auto
speed auto
}
ethernet eth1 {
address 172.12.234.3/24
description R2-R3-R4
duplex auto
hw-id 00:0c:29:21:bd:79
smp_affinity auto
speed auto
}
ethernet eth2 {
address dhcp
description DMZ
duplex auto
hw-id 00:0c:29:21:bd:83
smp_affinity auto
speed auto
}
loopback lo {
}
}
policy {
access-list 150 {
rule 10 {
action permit
destination {
any
}
source {
inverse-mask 0.0.0.255
network 172.12.234.0
}
}
}
prefix-list ALL-ROUTES {
rule 10 {
action permit
le 32
prefix 0.0.0.0/0
}
}
route-map SET-LOCAL-PREF {
rule 10 {
action permit
match {
ip {
address {
prefix-list ALL-ROUTES
}
}
}
set {
local-preference 201
}
}
}
route-map SET-MED {
rule 10 {
action permit
match {
ip {
address {
access-list 150
}
}
}
set {
metric 101
}
}
rule 20 {
action permit
match {
ip {
address {
prefix-list ALL-ROUTES
}
}
}
}
}
}
protocols {
bgp 234 {
neighbor 172.12.123.1 {
remote-as 1
route-map {
export SET-MED
}
}
neighbor 172.12.234.4 {
nexthop-self
remote-as 234
route-map {
export SET-LOCAL-PREF
}
}
redistribute {
connected {
}
}
}
}
service {
dns {
forwarding {
cache-size 150
listen-on eth1
name-server 208.67.222.222
name-server 208.67.220.220
}
}
ssh {
allow-root
port 22
protocol-version v2
}
}
system {
host-name R3
login {
user root {
authentication {
encrypted-password $1$ORKO400D$9GoL/vifapZLo3p.sLkUs/
plaintext-password ""
}
level admin
}
user vyatta {
authentication {
encrypted-password $1$Z9oMjC/m$r.T2vNILnVuZnIwkKhg58.
}
level admin
}
}
ntp-server 0.vyatta.pool.ntp.org
package {
auto-sync 1
repository community {
components main
distribution stable
password ""
url http://packages.vyatta.com/vyatta
username ""
}
repository lenny {
components main
distribution lenny
password ""
url http://packages.vyatta.com/debian/
username ""
}
repository VC6 {
components main
distribution VC6.0
password ""
url http://packages.vyatta.com/vyatta/
username ""
}
}
syslog {
global {
facility all {
level notice
}
facility protocols {
level debug
}
}
}
time-zone GMT
}


/* Warning: Do not remove the following line. */
/* === vyatta-config-version: "cluster@1:dhcp-relay@1:dhcp-server@4:firewall@3:ipsec@2:nat@3:quagga@1:system@3:vrrp@1:wanloadbalance@2:webgui@1:webproxy@1" === */
/* Release version: VC6.0-2010.03.22 */


R4

firewall {
all-ping enable
broadcast-ping disable
conntrack-table-size 32768
conntrack-tcp-loose enable
ip-src-route disable
ipv6-receive-redirects disable
ipv6-src-route disable
log-martians enable
name ALLOW_ESTABLISHED {
default-action drop
rule 10 {
action accept
state {
established enable
}
}
}
receive-redirects disable
send-redirects enable
source-validation disable
syn-cookies enable
}
interfaces {
ethernet eth0 {
address 172.12.234.4/24
duplex auto
smp_affinity auto
speed auto
}
ethernet eth2 {
address dhcp
duplex auto
smp_affinity auto
speed auto
}
loopback lo {
}
}
protocols {
bgp 234 {
neighbor 172.12.234.2 {
remote-as 234
}
neighbor 172.12.234.3 {
remote-as 234
}
redistribute {
connected {
}
}
}
}
service {
dhcp-server {
disabled false
shared-network-name POOL1 {
authoritative disable
subnet 192.168.10.0/24 {
default-router 192.168.10.1
dns-server 192.168.10.1
domain-name Vyatta.local
lease 86400
start 192.168.10.10 {
stop 192.168.10.200
}
}
}
}
dns {
forwarding {
cache-size 150
listen-on eth1
name-server 208.67.222.222
name-server 208.67.220.220
}
}
nat {
rule 10 {
outbound-interface eth0
source {
address 192.168.10.0/24
}
type masquerade
}
}
ssh {
allow-root
port 22
protocol-version v2
}
}
system {
host-name R4
login {
user root {
authentication {
encrypted-password $1$ORKO400D$9GoL/vifapZLo3p.sLkUs/
plaintext-password ""
}
level admin
}
user vyatta {
authentication {
encrypted-password $1$Z9oMjC/m$r.T2vNILnVuZnIwkKhg58.
}
level admin
}
}
ntp-server 0.vyatta.pool.ntp.org
package {
auto-sync 1
repository community {
components main
distribution stable
password ""
url http://packages.vyatta.com/vyatta
username ""
}
repository lenny {
components main
distribution lenny
password ""
url http://packages.vyatta.com/debian/
username ""
}
repository VC6 {
components main
distribution VC6.0
password ""
url http://packages.vyatta.com/vyatta/
username ""
}
}
syslog {
global {
facility all {
level notice
}
facility protocols {
level debug
}
}
}
time-zone GMT
}


/* Warning: Do not remove the following line. */
/* === vyatta-config-version: "cluster@1:dhcp-relay@1:dhcp-server@4:firewall@3:ipsec@2:nat@3:quagga@1:system@3:vrrp@1:wanloadbalance@2:webgui@1:webproxy@1" === */
/* Release version: VC6.0-2010.03.22 */

Sunday 16 May 2010

VMware Storage Alphabet Soup and Making the Most of VMwares Multipathing

Having recently moved into an enviroment where the storage is a little alien to me, I thought would be helpful to buff up on some storage knowledge and thought it might help some readers too.
Here is a diagram of a midrange san:

(Thanks Virtualgeek for this picture)


See the two items list as "Data Processor(head) A" and "Data Processor(head) B"?
Traditionally if you are using Active/Active Processor array you should use "Fixed" as the Multipathing method and In an Active/Passive array use "MRU".

However this changed with:
ALUA:Symmetric Logical Unit Access
Essentially in midrange san enviroments (EMC Clariion etc), this allows an unoptimized and an optimized path to a lun through different heads.

ESX(4) the HBA is aware of optimized and unoptimized paths as it knows which head has control of the LUN!
Suddenly we can use MRU with Active/Active heads.

MRU
Most recently used:Use the Optimized Path unless it is not avalible then use the Unoptimized path (ESX 4.0/vSphere only)

Fixed: Always use this LUN unless it is unavalible.

NMP:Native MultiPath Driver:

MMP:Multipath Plugin (EMC Powerpath)

Round Robin: Within ESX server's iSCSI HBA it sends 4000 IO blocks down one path then moves to the next path.

Custom Policy
:
Use the following commmand to tweak the iSCSI HBA
esxcfg-mpath --lun vmhba32:0:8 --policy custom --custom-hba-policy any --custom-max-blocks 1024 --custom-max-commands 50 --custom-target-policy any


References:
http://www.vmware.com/pdf/vi3_35/esx_3/r35/vi3_35_25_iscsi_san_cfg.pdf
http://www.vmware.com/pdf/vi3_35_25_roundrobin.pdf
http://virtualgeek.typepad.com/virtual_geek/2009/09/a-couple-important-alua-and-srm-notes.html
http://virtualgeek.typepad.com/virtual_geek/2008/08/celerra-virtual.html

Having problems connecting Outlook 2007 to Exchange 2003? SPN might be to blame

Afternoon,

I was having some problems today connection Outlook 2007 to an Exchange 2003 SP2 box today.

Here is the Error message that was being recieved:

The connection to Microsoft Exchange is unavailable. Outlook must be online or connected to complete this action.


After a couple of hours playing around I managed to narrow this down to Outlook 2007 now authenticating with kerberos and not being able to find the Service Prinical Name for the global catalog server.

Authentication via Outlook 2003 (NTLM) was perfect, as was HTTPS (OWA) this was just affecting Kerberos.

Here is how I fixed it:
1) Install Windows Server 2003 Support tools:SUPPTOOLS.MSI
2)Run setspn -L ExchangeServerName you will see something like this:

Registered ServicePrincipalNames for CN=,CN=Computers,DC=example,DC=com:
exchangeAB/
exchangeAB/.example.com
exchangeMDB/
exchangeMDB/.example.com
exchangeRFR/
exchangeRFR/.example.com
SMTPSVC/
SMTPSVC/.example.com
HOST/
HOST/.example.com


exchangeAB/
exchangeAB/.example.com


The above line is the one we are interested in. We need to change it:

setspn -D exchangeAB/ExchangeServerName ExchangeServerName
setspn -D exchangeAB/ExchangeServerName.example.com ExchangeServerName


Then re-add the details:

setspn -A exchangeAB/GlobalCatalogServerName GlobalCatalogServerName
setspn -A exchangeAB/GlobalCatalogServerName.example.com GlobalCatalogServerName


The output from setspn should now be:


Registered ServicePrincipalNames for CN=,CN=Computers,DC=example,DC=com:
exchangeMDB/
exchangeMDB/.example.com
exchangeRFR/
exchangeRFR/.example.com
SMTPSVC/
SMTPSVC/.example.com
HOST/
HOST/.example.com


Note the ExchangeAB SPNs are gone as they are now pointing to the domain controller (GC)


Reference List:
http://support.microsoft.com/kb/927612/en-us

Thursday 6 May 2010

Using VMware View with Network cards as Removeable Devices

This is only going to be a quick on hopefully :)

For those that do not know vmware presents most of their nics as removeable/USB devices PCNET(Vlance),Intel e1000 and vmxnet,vmxnet2,vmxnet3 this is to allow the feature of "hot add" which is a great way off adding hardware to a VM without powering the machine off.

Today whilst playing around it was highlighted to me that some "adventurous" VM View users that had USB enabled used that oppurtunity to disable the network card. Forcing the intervention of the admin from the cloud to re-add the vnic

Heres a couple of ways around it:

1) Use the configuration options to add "devices.hotplug" = "false" like this:


*Also does not affect cpu/mem hotplug

2) Edit the *.vmx file and add:

devices.hotplug = "false"


3) Hide the "safelty remove hardware option" like this:


4) Use the "NoDisplayClass" to customize the driver *yuck!


Hope that helps someone out there!


Source:http://kb.vmware.com/selfservice/microsites/search.do?cmd=displayKC&docType=kc&externalId=1012225&sliceId=1&docTypeID=DT_KB_1_1&dialogID=64244650&stateId=0%200%2067543541
*NB:Using VMXnet3 does not disable hot plug as indicated in the KB

Wednesday 5 May 2010

Using HSRP,CARP and VRRP within VMware

Hi all,

Just a quick note incase it helps anyone else out there.

I was recently in a lab moving from a vSS (Virtual Standard Switch) over to a vDS (Virtual distributed switch) when I came across and issue with a Pfsense box.

I had two VMs using CARP (which is like HSRP or VRRP) to push about a highly avalible IP address.
Now most vm admins out there will work out that for VRRP or CARP to work you need to enable "Promiscuous Mode" within the vSS or within the port group.


The issue I came across was with Promiscuous Mode and one uplink port (vDS or vSS) CARP was working perfectly however on adding the second uplink port to the vDS, pings to the CARP address were dropping.

Therefore - lesson learned was: When load balaning across multiple nics (or uplink ports in vDS terminology) you need to also be using the load balancing method of "Route Based on IP hash" (with accompanying switch config) if you plan to use CARP or VRRP else it will not work!

Tuesday 13 April 2010

Vyatta VC 6 - Final with VMware Tools Included

Hi Everyone,

Vyatta Released VC 6.0 late last month and although it did include OpenVM-tools which is great, there are a few people out there (myself included) who really want a VM to come already included with VMware tools and VMxnet3 especially performance matters at all to you :)

Sorry for the delay in getting this out, however compiling VMware tools for the Vyatta 2.6.31 custom kernel was not as easy as I had planned.

Here is the listing with VMware:
http://www.vmware.com/appliances/directory/383813

and here is the direct link:
VyattaVC6-Final.zip

And once you have downloaded it, why not give one of my labs ago here


Enjoy!

Router on a Stick within vSphere using Vyatta and Optimizing for 1Gbps Routing

Vyatta have released VC6.0 final so I thought I would modify it a little by removing Openvm-tools and replace it with VMware tools, configure it with vmxnet 3 then bring it all together within vSphere for some iPerf benching.

So here we have the "Router on a stick" where we use a Vyatta VM to route between two VM networks with VLAN Trunk then optimize with Jumbo Frames (MTU 9000) on the vnics,vswitch and changing adapter types.


Part 1

Lab Setup
Configuration of Vyatta
Configuration of vSphere (VLAN Trunk)
Configure Routing
Benchmark using iPerf


Router on a Stick within vSphere using Vyatta and Optimizing for 1Gbps Routing - Part 1 from Richard Vimeo on Vimeo.


Part 2
Configuring Jumbo frame on guests
Configuring Jumbo frame on vSwitch
Changing vNic type
Benchmark with iPerf


Router on a Stick within vSphere using Vyatta and Optimizing for 1Gbps Routing - Part 2 from Richard Vimeo on Vimeo.


Here is the KB relating to why Windows XP (32bit) and Windows Server (32bit) come up with a 1.4Gbps link speed for 10Gbps drivers/adapters.
http://support.microsoft.com/kb/931857

And for those that cannot wait for the VMware Appliance here is the link to:
Vyatta VC 6.0 - Final with VMware Tools

Vyatta Config

firewall {
all-ping enable
broadcast-ping disable
conntrack-table-size 32768
conntrack-tcp-loose enable
ip-src-route disable
ipv6-receive-redirects disable
ipv6-src-route disable
log-martians enable
name ALLOW_ESTABLISHED {
default-action drop
rule 10 {
action accept
state {
established enable
}
}
}
receive-redirects disable
send-redirects enable
source-validation disable
syn-cookies enable
}
interfaces {
ethernet eth0 {
address dhcp
description Outside
duplex auto
firewall {
in {
name ALLOW_ESTABLISHED
}
local {
name ALLOW_ESTABLISHED
}
}
hw-id 00:50:56:83:39:3e
smp_affinity auto
speed auto
}
ethernet eth1 {
MTU 9000
description Inside
duplex auto
hw-id 00:50:56:83:70:c3
smp_affinity auto
speed auto
vif 10 {
address 192.168.10.1/24
description VLAN-10
}
vif 20 {
address 192.168.20.1/24
description VLAN-20
}
}
ethernet eth2 {
description DMZ
duplex auto
hw-id 00:50:56:83:51:b7
smp_affinity auto
speed auto
}
loopback lo {
}
}
service {
dhcp-server {
disabled false
shared-network-name POOL1 {
authoritative disable
description VLAN10
subnet 192.168.10.0/24 {
default-router 192.168.10.1
dns-server 192.168.10.1
domain-name Vyatta.local
lease 86400
start 192.168.10.10 {
stop 192.168.10.200
}
}
}
shared-network-name POOL2 {
authoritative disable
description VLAN20
subnet 192.168.20.0/24 {
default-router 192.168.20.1
dns-server 192.168.20.1
domain-name vyatta.local
lease 86400
start 192.168.20.10 {
stop 192.168.20.240
}
}
}
}
dns {
forwarding {
cache-size 150
listen-on eth1.10
listen-on eth1.20
name-server 208.67.222.222
name-server 208.67.220.220
}
}
nat {
rule 10 {
outbound-interface eth0
source {
address 192.168.10.0/24
}
type masquerade
}
rule 20 {
outbound-interface eth0
source {
address 192.168.20.0/24
}
type masquerade
}
}
ssh {
allow-root
port 22
protocol-version v2
}
}
system {
host-name vyatta
login {
user root {
authentication {
encrypted-password $1$ORKO400D$9GoL/vifapZLo3p.sLkUs/
plaintext-password ""
}
level admin
}
user vyatta {
authentication {
encrypted-password $1$Z9oMjC/m$r.T2vNILnVuZnIwkKhg58.
}
level admin
}
}
ntp-server 0.vyatta.pool.ntp.org
package {
auto-sync 1
repository community {
components main
distribution stable
password ""
url http://packages.vyatta.com/vyatta
username ""
}
repository lenny {
components main
distribution lenny
password ""
url http://packages.vyatta.com/debian/
username ""
}
repository VC6 {
components main
distribution VC6.0
password ""
url http://packages.vyatta.com/vyatta/
username ""
}
}
syslog {
global {
facility all {
level notice
}
facility protocols {
level debug
}
}
}
time-zone GMT
}


/* Warning: Do not remove the following line. */
/* === vyatta-config-version: "cluster@1:dhcp-relay@1:dhcp-server@4:firewall@3:ipsec@2:nat@3:quagga@1:system@3:vrrp@1:wanloadbalance@2:webgui@1:webproxy@1" === */
/* Release version: VC6.0-2010.03.22 */


Enjoy!

Wednesday 31 March 2010

Managed Service Provider using Vyatta (OpenVPN Client Specific Subnets) and PRTG to monitor Customers

Possibly my longest title ever?
As the intro says this is a bit of roleplay for us, we are setting up the lab as a Managed Service Provider (MSP) who wishes to have a way to tunnel in (or in this case have the client tunnel out) to HQ where we can monitor all the goodies that PRTG can monitor remotely.

Heres the diagram:


Intro Video and lab setup:

Managed Service Provider using Vyatta (OpenVPN) and PRTG to monitor Customers - Part 1 from Richard Vimeo on Vimeo.


Part 2
Setup of connectivity
Setup OpenVPN Server with client specific info
Setup OpenVPN Client
Using Easy-RSA to generate certificates and keys
Securing interfaces with Firewall
Securing vtun0 interface with firewall


Managed Service Provider using Vyatta (OpenVPN) and PRTG to monitor Customers - Part 2 from Richard Vimeo on Vimeo.


Enjoy!

Wednesday 24 March 2010

Network Monitoring/Sniffing using vSphere and PRTG Redux

Hi,

As ever I try and bring you guys (and girls?) something a little different :)
After completing this video here and being in contact directly with PRTG it came to my attention that the version I was using "PRTG Traffic Grapher V6" was EOL and the new version "PRTG Network Monitor" is the successor.
Network Monitor does have alot of cool new features including an iPhone app (cant wait for a droid version) and the best bit...they were kind enough to provide me with a copy of PRTG Network Monitor V7 for this video.

Part1
A cool tour of some of the features of PRTG Network Monitor V7 and how we use our virtual machine to monitor our voice network

Network Monitoring/Sniffing using vSphere and PRTG Ver 2 - Part 1 from Richard Vimeo on Vimeo.


Part2
This video actually shows you how we set the whole thing up!

Network Monitoring/Sniffing using vSphere and PRTG Ver 2 - Part 2 from Richard Vimeo on Vimeo.

Monday 22 March 2010

Windows 2003 Clustering with EMC Celerra VM

So its almost coming up for a year since I really gave this blogging thing ago, it reminded me of my first videos, back when I was using VMware's built in tools to record video (which actually are not that bad!) however on my travels I bumped into this article here

And in most of previous labs that required clustered storage Ive used Openfiler, which is great, however when I try and do lab I like to do an Open and a Closed Source version like here
Testing Vyatta with QoS and Asterisk(Elastix)
where I used an Opensource router and PBX
then here a closed version
Testing QoS with Cisco Call Manager and SIP,RTP


So in that vain here we go:


Windows 2003 Clustering with EMC Celerra VM -Intro
A tour of a Windows 2003 cluster with clustered File Share using EMC Celerra as the iSCSI target.

Windows 2003 Clustering with EMC Celerra VM -Intro from Richard Vimeo on Vimeo.


Windows 2003 Clustering with EMC Celerra VM -Part1
In this video we do the majority of the setting up from domain controller to iSCSI LUN masking, its all here!

Some Commands you might find handy:
Change hostname /etc/host - new ip address hostname
/etc/sysconfig/network - domainname=cookie.local

hostname=cel1
service network restart


export NAS_DB=/nas
(root - ssl trust)
/nas/sbin/rootnas_cel -list
/nas/sbin/rootnas_cel -update id=0
/nas/sbin/nas_config -ssl
/nas/sbin/js_fresh_restart
nas_license -init

/opt/blackbird/tools init_storageID


Windows 2003 Clustering with EMC Celerra VM -Part1 from Richard Vimeo on Vimeo.


Windows 2003 Clustering with EMC Celerra VM -Part2
Using "cluster administrator" to create our new cluster and add a new node..

Windows 2003 Clustering with EMC Celerra VM -Part2 from Richard Vimeo on Vimeo.


Windows 2003 Clustering with EMC Celerra VM -Part3
Testing!

Windows 2003 Clustering with EMC Celerra VM -Part3 from Richard Vimeo on Vimeo.


Sources:
http://virtualgeek.typepad.com/virtual_geek/2008/08/celerra-virtual.html

Thursday 11 March 2010

Network Monitoring/Sniffing using vSphere and PRTG

Hopefully this is an interesting video, as it combines using a vSphere infrastructure to get visibility of both your virtual and non-virtual networks.

Part 1
Quick tour of the Network Monitoring setup

Network Monitoring/Sniffing using vSphere and PRTG - Part 1 from Richard Vimeo on Vimeo.


Part 2
Setup VM
Setup Switch
Setup Vlan trunk (switch,port group,vSwitch)
Installing PRTG

Network Monitoring/Sniffing using vSphere and PRTG - Part 2 from Richard Vimeo on Vimeo.

Tuesday 9 March 2010

Samba Cluster with GFS 2, Centos 5, iSCSI and Openfiler

Another awesome lab/demo for you today ;)

But seriously, after finding the general documentation to be a bit lacking regarding clustering (especially with regards to the extra quorum vote)

Heres hoping that this lab will allow you to work out how clusters work and implement it within your company.

A diagram for your viewing pleasure:


Part1
VMware Lab Setup
Node Setup
iSCSI setup
Quorum Setup

Helpful Commands:

system-config-network
edit /etc/hosts
service network restart
yum groupinstall "Clustering"
yum groupinstall "Cluster Storage"
yum groupinstall "Windows File Server"
chkconfig --del smb
yum install iscsi-initiator-utils
service iscsi start
iscsiadm -m discovery -t sendtargets -p 192.168.1.3
service iscsi restart
fdisk -l
mkqdisk -c /dev/sdb -l quorum
luci_admin init

Samba Cluster with GFS 2, Centos 5, iSCSI and Openfiler - Part 1 from Richard Vimeo on Vimeo.


Part2
GFS2 Setup
Configuring using Luci
Quorum setup cont

Helpful Commands:

mkfs.gfs2 -p lock_dlm -t cluster1:sanvol1 -j 4 /dev/sdc
mkdir /san
mkdir /san/sanvol1
service ricci restart
service qdiskd restart
chkconfig luci on
chkconfig qdiskd on
(do node2)

use luci to create cluster


Quorum parameters:
interval=1
votes=1
tko=10
min score=1
heuristics=ping -c2 -t1 192.168.1.3

mount /dev/sdc /san/sanvol1
gfs2_tool list
gfs2_tool df
umount /san/sanvol1

cman_tool status


Samba Cluster with GFS 2, Centos 5, iSCSI and Openfiler - Part 2 from Richard Vimeo on Vimeo.


Part 3
Configuring Fencing, Failover Domain, Resources
and Services.

Helpful Commands:

Configure Resources:
IP
GFS
Samba

Configure failover Domains

Configure Shared Fencing Device (then nodes)

Add Services

workgroup = cookie
server string = Samba Server Version %v
bind interfaces only = yes
interfaces = 10.0.1.100
netbios name = cluster1
local master = no
domain master = no
preferred master = no
password server = None
guest ok = yes
guest account = root
security = SHARE
dns proxy = no


[sanvol]
comment = High Availability Samba Service
browsable = yes
writable = yes
public = yes
path = /san/sanvol1
guest ok=yes
create mask=0777

smbpasswd -a root

scp /etc/samba/smb.conf.cluster1 node2:/etc/samba/

restart smb

redo services - ip-GFS-samba

soft reboot


Samba Cluster with GFS 2, Centos 5, iSCSI and Openfiler - Part 3 from Richard Vimeo on Vimeo.


Part 4
Testing!

Samba Cluster with GFS 2, Centos 5, iSCSI and Openfiler - Part 4 from Richard Vimeo on Vimeo.


Enjoy!