Showing posts with label ipsec. Show all posts

Wednesday, 26 August 2009

DMVPN - How to

After seeing a few requests for this, I thought it would be good to do a "Dynamic Multipoint Virtual Private Network".

Which is a nice TLA for Multipoint GRE(Tunnel), NHRP(Next Hop Routing Protocol) and IPSEC.

So here is the lab:
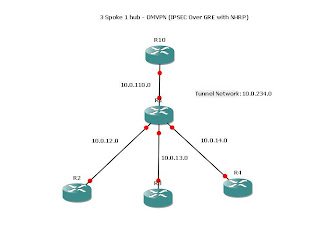

Very boring compared to the MPLS L2 lab however there are some important techs to get used to.

For the purposes of the lab, R1 is not under our control.

Therefore all the spoke routers have a default route to the R1 and that is it.
It is up to the DMVPN to fill in the gaps.

Here is R10 which is the HQ or "Hub" router.

interface Tunnel0
!All the tunnels have to be in the same subnet
ip address 10.0.234.10 255.255.255.0
no ip redirects
ip mtu 1400
!Dynamically map to the spokes
ip nhrp map multicast dynamic
!Network-id has to be the same on all routers
ip nhrp network-id 1
ip nhrp holdtime 450
ip tcp adjust-mss 1360
!This is needed as OSPF auto-configs a "tunnel int" as point-to-point which is wrong !here
ip ospf network point-to-multipoint
!Exit interface
tunnel source FastEthernet1/0
!Tunnel mode
tunnel mode gre multipoint


R2

interface Tunnel0
ip address 10.0.234.2 255.255.255.0
no ip redirects
ip mtu 1400
ip nhrp map multicast 10.0.110.10
ip nhrp map 10.0.234.10 10.0.110.10
ip nhrp network-id 1
ip nhrp holdtime 450
ip nhrp nhs 10.0.234.10
ip tcp adjust-mss 1360
ip ospf network point-to-multipoint
tunnel source FastEthernet1/0
tunnel mode gre multipoint


R3

!
interface Tunnel0
ip address 10.0.234.3 255.255.255.0
no ip redirects
ip mtu 1400
ip nhrp map multicast 10.0.110.10
ip nhrp map 10.0.234.10 10.0.110.10
ip nhrp network-id 1
ip nhrp holdtime 450
ip nhrp nhs 10.0.234.10
ip tcp adjust-mss 1360
ip ospf network point-to-multipoint
tunnel source FastEthernet1/0
tunnel mode gre multipoint


R4

interface Tunnel0
ip address 10.0.234.4 255.255.255.0
no ip redirects
ip mtu 1400
ip nhrp map multicast 10.0.234.10
ip nhrp map 10.0.234.10 10.0.110.10
ip nhrp network-id 1
ip nhrp holdtime 450
ip nhrp nhs 10.0.234.10
ip tcp adjust-mss 1360
ip ospf network point-to-multipoint
tunnel source FastEthernet1/0
tunnel mode gre multipoint


That should be the tunnel up. At this point you can test the tunnel by ping the Hub tunnel address 10.0.234.10 from each of the spokes.

Now encryption:
R10

crypto isakmp policy 100
encr aes
authentication pre-share
group 2
crypto isakmp key letmein address 0.0.0.0 0.0.0.0
!
!
crypto ipsec transform-set TUN-TRANSFORM esp-aes esp-sha-hmac
!
crypto ipsec profile TUN-PROFILE
set transform-set TUN-TRANSFORM


Then applied to the Tunnel inteface:

interface Tunnel0
ip address 10.0.234.10 255.255.255.0
no ip redirects
ip mtu 1400
ip nhrp map multicast dynamic
ip nhrp network-id 1
ip nhrp holdtime 450
ip tcp adjust-mss 1360
ip ospf network point-to-multipoint
tunnel source FastEthernet1/0
tunnel mode gre multipoint
tunnel protection ipsec profile TUN-PROFILE
!


then the same for R2,R3,R4:

crypto isakmp policy 100
encr aes
authentication pre-share
group 2
crypto isakmp key letmein address 0.0.0.0 0.0.0.0
!
!
crypto ipsec transform-set TUN-TRANSFORM esp-aes esp-sha-hmac
!
crypto ipsec profile TUN-PROFILE
set transform-set TUN-TRANSFORM
!


~Under the Tunnel0 interface:

!
tunnel protection ipsec profile TUN-PROFILE
!


This is identicial for each spoke.

Then an example OSPF config on R2:

!
router ospf 1
router-id 2.2.2.2
log-adjacency-changes
network 2.2.2.2 0.0.0.0 area 0
network 10.0.234.0 0.0.0.255 area 0
network 192.168.2.0 0.0.0.255 area 2
!


Done!

Thursday, 6 August 2009

IPSec Tunnel..with a difference Part 2

Another Part2 ! This one you seen alot in production enviroments and that is "Floating Statics" or as I like to call them "Backup Floaters" :)

Here is the lab:


As we have already tackled most of the config here I wont waste your time by going through it again.

Therefore the configuration below is only concerned with the ISDN link.

BB2:

isdn switch-type basic-ni
!
interface BRI0/0
ip address 192.168.2.2 255.255.255.0
encapsulation hdlc
dialer map ip 192.168.2.1 broadcast 21
dialer-group 1
isdn switch-type basic-ni
isdn point-to-point-setup
!
ip route 0.0.0.0 0.0.0.0 192.168.2.1 200 name BackupFloater


Core:

interface BRI0/0
ip address 192.168.2.1 255.255.255.0
dialer map ip 192.168.2.2 broadcast 11
dialer-group 1
isdn switch-type basic-ni
!
ip route 0.0.0.0 0.0.0.0 192.168.2.2 200 name BackupFloater


Then as R1 does not know about the 192.168.2.0 network:
R1

ip route 0.0.0.0 0.0.0.0 192.168.4.2 200 name BackupFloater


Done!

Notes:
I set the AD to 200 so that if in the future a dynamic routing protocol is used the default static floater will not get in the way.
The ISDN connection here does not use any sort of authentication, if that is important to you and it should be in production! look here

Wednesday, 5 August 2009

Generic Routing Encapsulation (GRE) over IP Security (IPSec) Part 1

"Generic Routing Encapsulation (GRE) over IP Security (IPSec)"
is the longest title to one of my blog posts yet I could almost added
"...with two way OSPF<->EIGRP Redistribution"..so count yourself lucky :P

So In case you do not know, IPSec although great cannot carry multicast traffic, however GRE which can carry multicast traffic is not encrypted..and hence GRE over IPsec was born!

Here is the Lab:

Establishing IP Connectivity is the easy part, now on to the Tunnels:
R2

interface Tunnel0
ip address 192.168.12.2 255.255.255.0
tunnel source 10.0.12.2
tunnel destination 10.0.12.1


R3

interface Tunnel0
ip address 192.168.13.3 255.255.255.0
tunnel source 10.0.0.3
tunnel destination 10.0.0.1


R4

interface Tunnel0
ip address 192.168.14.4 255.255.255.0
tunnel source 10.0.0.4
tunnel destination 10.0.0.1


On R1 each spoke requires its own tunnel:

R1

interface Tunnel2
ip address 192.168.12.1 255.255.255.0
tunnel source 10.0.12.1
tunnel destination 10.0.12.2
!
interface Tunnel3
ip address 192.168.13.1 255.255.255.0
tunnel source 10.0.0.1
tunnel destination 10.0.0.3
!
interface Tunnel4
ip address 192.168.14.1 255.255.255.0
tunnel source 10.0.0.1
tunnel destination 10.0.0.4
!


Now the tunnels are up we can now start with the encryption. As R2 is on a different interface to R3 and R4 we will have to setup two different Crypto Maps:
(notice "transport" not "tunnel" under the transform sets)

R2:

crypto isakmp policy 100
encr 3des
authentication pre-share
group 2
crypto isakmp key letmein address 0.0.0.0 0.0.0.0
!
!
crypto ipsec transform-set R2_TRANSFORM esp-3des esp-sha-hmac
mode transport
!
crypto map R22R1 10 ipsec-isakmp
set peer 10.0.12.1
set transform-set R2_TRANSFORM
match address 100

!ACL
access-list 100 permit gre host 10.0.12.2 host 10.0.12.1


Then under the interface:

crypto map R22R1


Here is the matching configuration on R1:

crypto isakmp policy 100
encr 3des
authentication pre-share
group 2
crypto isakmp key letmein address 0.0.0.0 0.0.0.0
!
!
crypto ipsec transform-set R1_TRANSFORM esp-3des esp-sha-hmac
mode transport
!
crypto map R12R2 10 ipsec-isakmp
set peer 10.0.12.2
set transform-set R1_TRANSFORM
match address 120

!ACL
access-list 120 permit gre host 10.0.12.1 host 10.0.12.2


Then again apply it to an interface:

crypto map R12R2


Now for the fun bit! As R3 and R4 connect to R1 via the same interface you need a special crypto map:

crypto map R1R3R4 10 ipsec-isakmp
set peer 10.0.0.3
set transform-set R1_TRANSFORM
match address 100
crypto map R1R3R4 20 ipsec-isakmp
set peer 10.0.0.4
set transform-set R1_TRANSFORM
match address 110
!


ACLs:

access-list 100 permit gre host 10.0.0.1 host 10.0.0.3
access-list 110 permit gre host 10.0.0.1 host 10.0.0.4


Apply it to the interface:

crypto map R1R3R4


The ISAKMP Policy (100) and the transform set stay the same for R3 and R4 so there is no need to restate them.

Now the matching configuration on R3 and R4
R3

crypto isakmp policy 100
encr 3des
authentication pre-share
group 2
crypto isakmp key letmein address 0.0.0.0 0.0.0.0
!
!
crypto ipsec transform-set R3_TRANSFORM esp-3des esp-sha-hmac
mode transport
!
crypto map R32R1 10 ipsec-isakmp
set peer 10.0.0.1
set transform-set R3_TRANSFORM
match address 100

!ACL
access-list 100 permit gre host 10.0.0.3 host 10.0.0.1


R4:

crypto isakmp policy 100
encr 3des
authentication pre-share
group 2
crypto isakmp key letmein address 0.0.0.0 0.0.0.0
!
!
crypto ipsec transform-set R4_TRANSFORM esp-3des esp-sha-hmac
mode transport
!
crypto map R42R1 10 ipsec-isakmp
set peer 10.0.0.1
set transform-set R4_TRANSFORM
match address 100
!ACL
access-list 100 permit gre host 10.0.0.4 host 10.0.0.1


You can test the GRE over IPsec tunnels are up by pinging other end of the tunnel to generate GRE traffic. E.g. Ping 10.0.0.1 from R4
It may drop a couple of packets before the link comes up, but once established it should be fine.

IPSec Tunnel..with a difference.

Well although it looks like July was quiet..it wasnt :)

Got some new kit in the lab another 2610XM for more IPSec madness and a very nice 3550 EMI for some MLS shenanigans.

So i was over here: http://www.networking-forum.com/viewtopic.php?f=35&t=12877

And I thought I would blog about the problem.

Here is the Lab:


First stage was to setup static routes across the routers so here is what they looked like:
R1

ip route 172.20.1.0 255.255.255.0 192.168.4.2
ip route 172.21.1.0 255.255.255.0 192.168.4.2
ip route 192.168.1.0 255.255.255.0 192.168.4.2
ip route 192.168.3.0 255.255.255.0 192.168.4.2

Core

ip route 172.16.1.0 255.255.255.0 192.168.4.1
ip route 172.17.1.0 255.255.255.0 192.168.4.1
ip route 172.20.1.0 255.255.255.0 192.168.1.2
ip route 172.21.1.0 255.255.255.0 192.168.1.2
ip route 192.168.3.0 255.255.255.0 192.168.1.2

BB1

ip route 172.16.1.0 255.255.255.0 192.168.1.1
ip route 172.17.1.0 255.255.255.0 192.168.1.1
ip route 172.20.1.0 255.255.255.0 192.168.3.2
ip route 172.21.1.0 255.255.255.0 192.168.3.2
ip route 192.168.4.0 255.255.255.0 192.168.1.1


BB2

ip route 172.16.1.0 255.255.255.0 192.168.3.1
ip route 172.17.1.0 255.255.255.0 192.168.3.1
ip route 192.168.1.0 255.255.255.0 192.168.3.1
ip route 192.168.4.0 255.255.255.0 192.168.3.1


Next step was to get up ISAKMP Policies on CORE and BB2 like this:
(same on each router)

crypto isakmp policy 100
encr 3des
authentication pre-share
group 2
crypto isakmp key letmein address 0.0.0.0 0.0.0.0


Then IPSEC transform sets:
Core:

crypto ipsec transform-set CORE_TRANSFORM esp-3des esp-sha-hmac

BB2:

crypto ipsec transform-set BB2_TRANSFORM esp-3des esp-sha-hmac


Then Crypto ACLs, now you have to be becareful with these as from what I have seen this is the number one area where people slip up ( and the PFS setting)
Rememeber it is always from perspective of which traffic you wish to be encrypted when it leaves the interface you apply the map too.


So here are the Crypto ACLs;
Core:

!This is to allow BB2 to ping 172.16.1.1 (from console)
access-list 100 permit ip host 172.16.1.1 host 192.168.3.2
!This is to allow BB2 to ping 172.17.1.1 (from console)
access-list 100 permit ip host 172.17.1.1 host 192.168.3.2
!This is to allow R1 to ping 172.20.1.1 (from console)
access-list 100 permit ip host 192.168.4.1 host 172.20.1.1
!This is to allow R1 to ping 172.21.1.1 (from console)
access-list 100 permit ip host 192.168.4.1 host 172.21.1.1
!This is to allow R1's networks to connect to BB2's Networks
access-list 100 permit ip 172.16.1.0 0.0.0.255 172.20.1.0 0.0.0.255
access-list 100 permit ip 172.16.1.0 0.0.0.255 172.21.1.0 0.0.0.255
access-list 100 permit ip 172.17.1.0 0.0.0.255 172.20.1.0 0.0.0.255
access-list 100 permit ip 172.17.1.0 0.0.0.255 172.21.1.0 0.0.0.255


BB2:

!This is to allow BB2 to ping 172.16.1.1 (from console)
access-list 100 permit ip host 192.168.3.2 host 172.16.1.1
!This is to allow BB2 to ping 172.17.1.1 (from console)
access-list 100 permit ip host 192.168.3.2 host 172.17.1.1
!This is to allow R1 to ping 172.21.1.1 (from console)
access-list 100 permit ip host 172.21.1.1 host 192.168.4.1
!This is to allow R1 to ping 172.21.1.1 (from console)
access-list 100 permit ip host 172.20.1.1 host 192.168.4.1
!This is to allow BB2's networks to connect to R1's Networks
access-list 100 permit ip 172.20.1.0 0.0.0.255 172.16.1.0 0.0.0.255
access-list 100 permit ip 172.21.1.0 0.0.0.255 172.16.1.0 0.0.0.255
access-list 100 permit ip 172.20.1.0 0.0.0.255 172.17.1.0 0.0.0.255
access-list 100 permit ip 172.21.1.0 0.0.0.255 172.17.1.0 0.0.0.255


Then bring it all together with a Crypto Map:
Core:

crypto map R12BB2 10 ipsec-isakmp
set peer 192.168.3.2
set transform-set CORE_TRANSFORM
match address 100


BB2:

crypto map BB22R1 10 ipsec-isakmp
set peer 192.168.1.1
set transform-set BB2_TRANSFORM
match address 100


Then apply the Crypto maps under the interfaces:
Core:

crypto map R12BB2

BB2

crypto map BB22R1

Thursday, 18 June 2009

Router to Router IPSec Tunnel

IPSec has two Phases, which is important to rememeber when setting up the router as Phase 1 (ISAKMP) and Phase 2 (IPSec) have to be configured.

There is an IPSec Tunnel Inbetween R1 and R5 - Here's the config:


R1

1) Define ISAKMP Policy:
Phase 1:

crypto isakmp policy 100
encr aes 256
authentication pre-share
group 5


2) Set ISAKMP key and link it to the peer router

crypto isakmp key letmer1r5 address 192.168.15.5


Phase 2:
3) Set up IPSec transform set

crypto ipsec transform-set R5_TRANSFORM ah-sha-hmac


4) Define which traffic should be encrypted when going out:

access-list 110 permit ip host 192.168.15.1 host 192.168.15.5

NB: Traffic which falls into the deny implict or explict is simply not encrypted, it is not dropped

5) Define Crypto Map:

crypto map R1_2_R5 10 ipsec-isakmp
set peer 192.168.15.5
set transform-set R5_TRANSFORM
match address 110


6) Apply the Crypto Map to the interface:

interface FastEthernet0/0
ip address 192.168.15.1 255.255.255.0
crypto map R1_2_R5


Then for R5

1) Define ISAKMP Policy:

crypto isakmp policy 100
encr aes 256
authentication pre-share
group 5


2) Set ISAKMP key and link it to the peer router

crypto isakmp key letmer1r5 address 192.168.15.1


3) Set up IPSec transform set

crypto ipsec transform-set R1_TRANSFORM ah-sha-hmac


4) Define which traffic should be encrypted when going out:

access-list 110 permit ip host 192.168.15.5 host 192.168.15.1


5) Define Crypto Map:

crypto map R5_2_R1 10 ipsec-isakmp
set peer 192.168.15.1
set transform-set R1_TRANSFORM
match address 110


6) Apply the Crypto Map to the interface:

interface FastEthernet0/0
ip address 192.168.15.5 255.255.255.0
crypto map R5_2_R1